Table of Contents
Refer: http://www.tutorialspoint.com/design_pattern/design_pattern_overview.htm
Software Design Pattern
Design patterns represent the best practices used by experienced object-oriented software developers. Design patterns are solutions to general problems that software developers faced during software development. These solutions were obtained by trial and error by numerous software developers over quite a substantial period of time.
Types of Desing Pattern:As per the design pattern reference book Design Patterns - Elements of Reusable Object-Oriented Software , there are 23 design patterns. These patterns can be classified in three categories: Creational, Structural and behavioral patterns
| S.N. | Name | Pattern & Description |
|---|---|---|
| 1 | Creational Patterns | These design patterns provides way to create objects while hiding the creation logic, rather than instantiating objects directly using new opreator. This gives program more flexibility in deciding which objects need to be created for a given use case. |
| 2 | Structural Patterns | These design patterns concern class and object composition. Concept of inheritance is used to compose interfaces and define ways to compose objects to obtain new functionalities. |
| 3 | Behavioral Patterns | These design patterns are specifically concerned with communication between objects. |
| 4 | J2EE Patterns | These design patterns are specifically concerned with the presentation tier. These patterns are identified by Sun Java Center. |
Creational Pattern: Factory Pattern
Factory pattern is one of most used design pattern in Java. This type of design pattern comes under creational pattern as this pattern provides one of the best ways to create an object.
Design
Implementation
- Step 1: Create an interface Shape.java:
public interface Shape {
   void draw();
}
- Step 2: Create concrete classes implementing the same interface.
- Step 3: Create a Factory to generate object of concrete class based on given information ShapeFactory.java
public class ShapeFactory {

   //use getShape method to get object of type shape
   public Shape getShape(String shapeType){
      if(shapeType == null){
         return null;
      }
      if(shapeType.equalsIgnoreCase("CIRCLE")){
         return new Circle();
      } else if(shapeType.equalsIgnoreCase("RECTANGLE")){
         return new Rectangle();
      } else if(shapeType.equalsIgnoreCase("SQUARE")){
         return new Square();
      }
      return null;
   }
}
- Step 4: Use the Factory to get object of concrete class by passing an information such as type FactoryPatternDemo.java:
public class FactoryPatternDemo {

   public static void main(String[] args) {
      ShapeFactory shapeFactory = new ShapeFactory();

      //get an object of Circle and call its draw method.
      Shape shape1 = shapeFactory.getShape("CIRCLE");

      //call draw method of Circle
      shape1.draw();

      //get an object of Rectangle and call its draw method.
      Shape shape2 = shapeFactory.getShape("RECTANGLE");

      //call draw method of Rectangle
      shape2.draw();

      //get an object of Square and call its draw method.
      Shape shape3 = shapeFactory.getShape("SQUARE");

      //call draw method of circle
      shape3.draw();
   }
}
- Step 5: Verify the output.
Inside Circle::draw() method.
Inside Rectangle::draw() method.
Inside Square::draw() method.
creational pattern: Singleton Pattern
This class provides a way to access its only object which can be accessed directly without need to instantiate the object of the class.Ensure a class has only one instance, and provide a global point of access to it
Design
We're going to create a SingleObject class. SingleObject class have its constructor as private and have a static instance of itself.
SingleObject class provides a static method to get its static instance to outside world. SingletonPatternDemo, our demo class will use SingleObject class to get a SingleObject object.

Implementation
- Step 1: Create a Singleton Class SingleObject.java
public class SingleObject {

   //create an object of SingleObject
   private static SingleObject instance = new SingleObject();

   //make the constructor private so that this class cannot be
   //instantiated
   private SingleObject(){}

   //Get the only object available
   public static SingleObject getInstance(){
      return instance;
   }

   public void showMessage(){
      System.out.println("Hello World!");
   }
}
- Step 2: Get the only object from the singleton class SingletonPatternDemo.java
public class SingletonPatternDemo {
   public static void main(String[] args) {

      //illegal construct
      //Compile Time Error: The constructor SingleObject() is not visible
      //SingleObject object = new SingleObject();

      //Get the only object available
      SingleObject object = SingleObject.getInstance();

      //show the message
      object.showMessage();
   }
}
- Step 3: Verify the output
Hello World!
Structural Pattern: Adapter Pattern
Adapter pattern works as a bridge between two incompatible interfaces. This type of design pattern comes under structural pattern as this pattern combines the capability of two independent interfaces.
Design
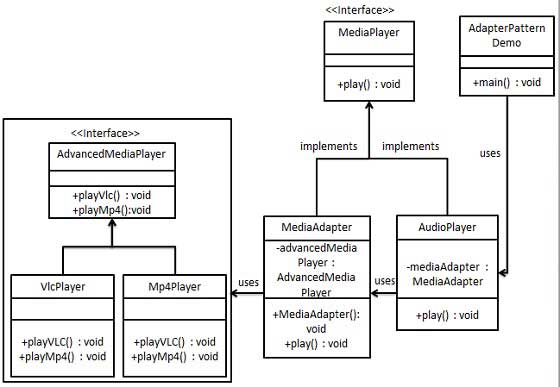
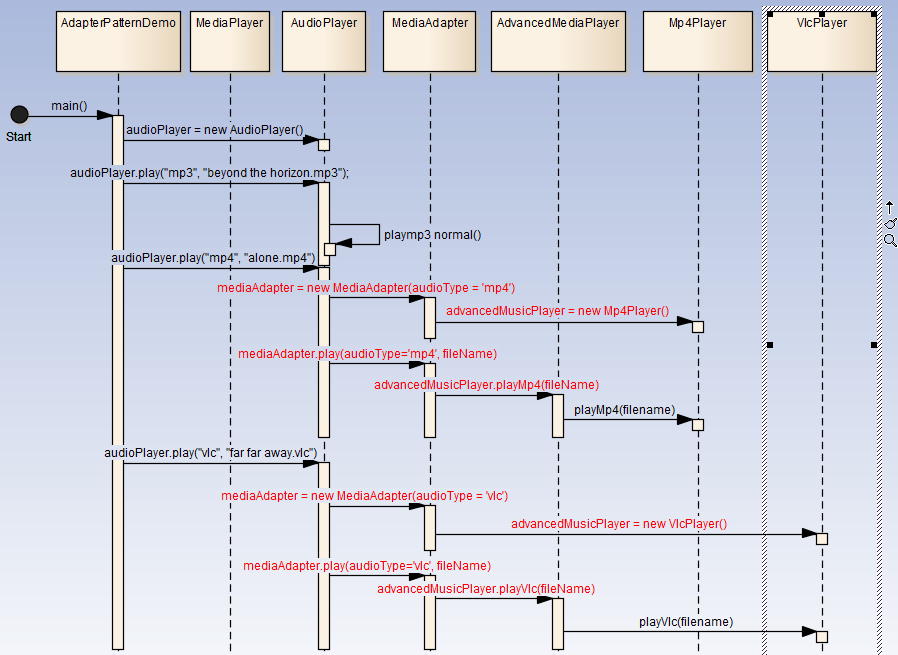
We've an interface MediaPlayer interface and a concrete class AudioPlayer implementing the MediaPlayer interface. AudioPlayer can play mp3 format audio files by default.
We're having another interface AdvancedMediaPlayer interface and concrete classes implementing the AdvancedMediaPlayer interface.These classes can play vlc and mp4 format files.
We want to make AudioPlayer to play other formats as well. To attain this, we've created an adapter class MediaAdapter which implements the MediaPlayer interface and uses AdvancedMediaPlayer objects to play the required format.


Implementation
- Step 1: Create interfaces for Media Player and Advanced Media Player
- Step 2: Create concrete classes implementing the AdvancedMediaPlayer interface
- Step 3: Create adapter class implementing the MediaPlayer interface MediaAdapter.java
public class MediaAdapter implements MediaPlayer {

   AdvancedMediaPlayer advancedMusicPlayer;

   public MediaAdapter(String audioType){
      if(audioType.equalsIgnoreCase("vlc") ){
         advancedMusicPlayer = new VlcPlayer();
      } else if (audioType.equalsIgnoreCase("mp4")){
         advancedMusicPlayer = new Mp4Player();
      }
   }

   @Override
   public void play(String audioType, String fileName) {
      if(audioType.equalsIgnoreCase("vlc")){
         advancedMusicPlayer.playVlc(fileName);
      }else if(audioType.equalsIgnoreCase("mp4")){
         advancedMusicPlayer.playMp4(fileName);
      }
   }
}
- Step 4: Create concrete class implementing the MediaPlayer interface AudioPlayer.java
public class AudioPlayer implements MediaPlayer {
   MediaAdapter mediaAdapter;

   @Override
   public void play(String audioType, String fileName) {

      //inbuilt support to play mp3 music files
      if(audioType.equalsIgnoreCase("mp3")){
         System.out.println("Playing mp3 file. Name: "+ fileName);
      }
      //mediaAdapter is providing support to play other file formats
      else if(audioType.equalsIgnoreCase("vlc")
         || audioType.equalsIgnoreCase("mp4")){
         mediaAdapter = new MediaAdapter(audioType);
         mediaAdapter.play(audioType, fileName);
      }
      else{
         System.out.println("Invalid media. "+
            audioType + " format not supported");
      }
   }
}
- Step 5: Use the AudioPlayer to play different types of audio formats AdapterPatternDemo.java
public class AdapterPatternDemo {
   public static void main(String[] args) {
      AudioPlayer audioPlayer = new AudioPlayer();

      audioPlayer.play("mp3", "beyond the horizon.mp3");
      audioPlayer.play("mp4", "alone.mp4");
      audioPlayer.play("vlc", "far far away.vlc");
      audioPlayer.play("avi", "mind me.avi");
   }
}
- Step 6: Verify the output
Playing mp3 file. Name: beyond the horizon.mp3
Playing mp4 file. Name: alone.mp4
Playing vlc file. Name: far far away.vlc
Invalid media. avi format not supported
Structural Pattern: Composite Pattern
Composite pattern is used where we need to treat a group of objects in similar way as a single object.
Design
We've a class Employee which acts as composite pattern actor class. CompositePatternDemo, our demo class will use Employee class to add department level hierarchy and print all employees.

Implementation
- Step 1: Create Employee class having list of Employee objects Employee.java
import java.util.ArrayList;
import java.util.List;

public class Employee {
   private String name;
   private String dept;
   private int salary;
   private List<Employee> subordinates;

   // constructor
   public Employee(String name,String dept, int sal) {
      this.name = name;
      this.dept = dept;
      this.salary = sal;
      subordinates = new ArrayList<Employee>();
   }

   public void add(Employee e) {
      subordinates.add(e);
   }

   public void remove(Employee e) {
      subordinates.remove(e);
   }

   public List<Employee> getSubordinates(){
     return subordinates;
   }

   public String toString(){
      return ("Employee :[ Name : "+ name
      +", dept : "+ dept + ", salary :"
      + salary+" ]");
   }
}
- Step 2: Use the Employee class to create and print employee hierarchy CompositePatternDemo.java
public class CompositePatternDemo {
   public static void main(String[] args) {
      Employee CEO = new Employee("John","CEO", 30000);

      Employee headSales = new Employee("Robert","Head Sales", 20000);

      Employee headMarketing = new Employee("Michel","Head Marketing", 20000);

      Employee clerk1 = new Employee("Laura","Marketing", 10000);
      Employee clerk2 = new Employee("Bob","Marketing", 10000);

      Employee salesExecutive1 = new Employee("Richard","Sales", 10000);
      Employee salesExecutive2 = new Employee("Rob","Sales", 10000);

      CEO.add(headSales);
      CEO.add(headMarketing);

      headSales.add(salesExecutive1);
      headSales.add(salesExecutive2);

      headMarketing.add(clerk1);
      headMarketing.add(clerk2);

      //print all employees of the organization
      System.out.println(CEO);
      for (Employee headEmployee : CEO.getSubordinates()) {
         System.out.println(headEmployee);
         for (Employee employee : headEmployee.getSubordinates()) {
            System.out.println(employee);
         }
      }
   }
}
- Step 3: Verify the output
Employee :[ Name : John, dept : CEO, salary :30000 ]
Employee :[ Name : Robert, dept : Head Sales, salary :20000 ]
Employee :[ Name : Richard, dept : Sales, salary :10000 ]
Employee :[ Name : Rob, dept : Sales, salary :10000 ]
Employee :[ Name : Michel, dept : Head Marketing, salary :20000 ]
Employee :[ Name : Laura, dept : Marketing, salary :10000 ]
Employee :[ Name : Bob, dept : Marketing, salary :10000 ]
Structural Pattern: Decorator pattern
Decorator pattern allows to add new functionality an existing object without altering its structure. This type of design pattern comes under structural pattern as this pattern acts as a wrapper to existing class.
Design
Below are demonstrating use of Decorator pattern via following example in which we'll decorate a shape with some color without alter shape class.
We're going to create a Shape interface and concrete classes implementing the Shape interface. We then create a abstract decorator class ShapeDecorator implementing the Shape interface and having Shape object as its instance variable.
RedShapeDecorator is concrete class implementing ShapeDecorator.
DecoratorPatternDemo, our demo class will use RedShapeDecorator to decorate Shape objects.


Implementation
- Step 1: Create an interface Shape.java
public interface Shape {
   void draw();
}
- Step 2: Create concrete classes implementing the same interface:
- Step 3: Create abstract decorator class implementing the Shape interface ShapeDecorator.java
public abstract class ShapeDecorator implements Shape {
   protected Shape decoratedShape;

   public ShapeDecorator(Shape decoratedShape){
      this.decoratedShape = decoratedShape;
   }

   public void draw(){
      decoratedShape.draw();
   }
}
- Step 4: Create concrete decorator class extending the ShapeDecorator class RedShapeDecorator.java
public class RedShapeDecorator extends ShapeDecorator {

   public RedShapeDecorator(Shape decoratedShape) {
      super(decoratedShape);
   }

   @Override
   public void draw() {
      decoratedShape.draw();
      setRedBorder(decoratedShape);
   }

   private void setRedBorder(Shape decoratedShape){
      System.out.println("Border Color: Red");
   }
}
- Step 5: Use the RedShapeDecorator to decorate Shape objects DecoratorPatternDemo.java
public class DecoratorPatternDemo {
   public static void main(String[] args) {

      Shape circle = new Circle();

      Shape redCircle = new RedShapeDecorator(new Circle());

      Shape redRectangle = new RedShapeDecorator(new Rectangle());
      System.out.println("Circle with normal border");
      circle.draw();

      System.out.println("\nCircle of red border");
      redCircle.draw();

      System.out.println("\nRectangle of red border");
      redRectangle.draw();
   }
}
- Step 6: Verify the output
Circle with normal border
Shape: Circle

Circle of red border
Shape: Circle
Border Color: Red

Rectangle of red border
Shape: Rectangle
Border Color: Red
Behavior Pattern: Iterator Pattern
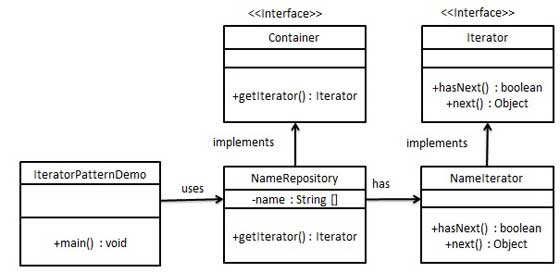
Iterator pattern is very commonly used design pattern in Java and .Net programming environment. This pattern is used to get a way to access the elements of a collection object in sequential manner without any need to know its underlying representation.
Design
Implementation
- Step 1: Create interfaces:
- Step 2: Create concrete class implementing the Container interface. This class has inner class NameIterator implementing the Iterator interface NameRepository.java
public class NameRepository implements Container {
   public String names[] = {"Robert" , "John" ,"Julie" , "Lora"};

   @Override
   public Iterator getIterator() {
      return new NameIterator();
   }

   private class NameIterator implements Iterator {

      int index;

      @Override
      public boolean hasNext() {
         if(index < names.length){
            return true;
         }
         return false;
      }

      @Override
      public Object next() {
         if(this.hasNext()){
            return names[index++];
         }
         return null;
      }
   }
}
- Step 3: Use the NameRepository to get iterator and print names IteratorPatternDemo.java
public class IteratorPatternDemo {

   public static void main(String[] args) {
      NameRepository namesRepository = new NameRepository();

      for(Iterator iter = namesRepository.getIterator(); iter.hasNext();){
         String name = (String)iter.next();
         System.out.println("Name : " + name);
      }
   }
}
- Step 4: Verify the output
Name : Robert
Name : John
Name : Julie
Name : Lora
Behavior Pattern: Observer Pattern
Observer pattern is used when there is one to many relationship between objects such as if one object is modified, its depenedent objects are to be notified automatically. Observer pattern falls under behavioral pattern category.
Design
Observer pattern uses three actor classes. Subject, Observer and Client. Subject, an object having methods to attach and de-attach observers to a client object. We've created classes Subject, Observer abstract class and concrete classes extending the abstract class the Observer.
ObserverPatternDemo, our demo class will use Subject and concrete class objects to show observer pattern in action.


Implementation
- Step 1: Create Subject class Subject.java:
import java.util.ArrayList;
import java.util.List;

public class Subject {

   private List<Observer> observers
      = new ArrayList<Observer>();
   private int state;

   public int getState() {
      return state;
   }

   public void setState(int state) {
      this.state = state;
      notifyAllObservers();
   }

   public void attach(Observer observer){
      observers.add(observer);
   }

   public void notifyAllObservers(){
      for (Observer observer : observers) {
         observer.update();
      }
   }
}
- Step 2: Create Observer class Observer.java
public abstract class Observer {
   protected Subject subject;
   public abstract void update();
}
- Step 3: Create concrete observer classes:
- Step 4: Use Subject and concrete observer objects ObserverPatternDemo.java
public class ObserverPatternDemo {
   public static void main(String[] args) {
      Subject subject = new Subject();

      new HexaObserver(subject);
      new OctalObserver(subject);
      new BinaryObserver(subject);

      System.out.println("First state change: 15");
      subject.setState(15);
      System.out.println("Second state change: 10");
      subject.setState(10);
   }
}
- Step 5: Verify the output
First state change: 15
Hex String: F
Octal String: 17
Binary String: 1111
Second state change: 10
Hex String: A
Octal String: 12
Binary String: 1010
Behavior Pattern:State Pattern
In State pattern a class behavior changes based on its state. This type of design pattern comes under behavior pattern.
Design
We're going to create a State interface defining a action and concrete state classes implementing the State interface. Context is a class which carries a State.
StatePatternDemo, our demo class will use Context and state objects to demonstrate change in Context behavior based on type of state it is in.


Implementation
- Step 1: Create an interface Image.java
public interface State {
   public void doAction(Context context);
}
- Step 2: Create concrete classes implementing the same interface
- Step 4: Use the Context to see change in behaviour when State changes StatePatternDemo.java
public class StatePatternDemo {
   public static void main(String[] args) {
      Context context = new Context();

      StartState startState = new StartState();
      startState.doAction(context);

      System.out.println(context.getState().toString());

      StopState stopState = new StopState();
      stopState.doAction(context);

      System.out.println(context.getState().toString());
   }
}
- Step 5: Verify the output
Player is in start state
Start State
Player is in stop state
Stop State
Model-View-Controller Pattern
This pattern is used to separate application's concerns:
- Model - Model represents an object or JAVA POJO carrying data. It can also have logic to update controller if its data changes.
- View - View represents the visualization of the data that model contains.
- Controller - Controller acts on both Model and view. It controls the data flow into model object and updates the view whenever data changes. It keeps View and Model separate.
Design
We're going to create a Student object acting as a model. StudentView will be a view class which can print student details on console and StudentController is the controller class responsible to store data in Student object and update view StudentView accordingly.
MVCPatternDemo, our demo class will use StudentController to demonstrate use of MVC pattern.


Implementation
- Step 1: Create Model Student.java
public class Student {
   private String rollNo;
   private String name;
   public String getRollNo() {
      return rollNo;
   }
   public void setRollNo(String rollNo) {
      this.rollNo = rollNo;
   }
   public String getName() {
      return name;
   }
   public void setName(String name) {
      this.name = name;
   }
}
- Step 3: Create Controller StudentController.java
public class StudentController {
   private Student model;
   private StudentView view;

   public StudentController(Student model, StudentView view){
      this.model = model;
      this.view = view;
   }

   public void setStudentName(String name){
      model.setName(name);
   }

   public String getStudentName(){
      return model.getName();
   }

   public void setStudentRollNo(String rollNo){
      model.setRollNo(rollNo);
   }

   public String getStudentRollNo(){
      return model.getRollNo();
   }

   public void updateView(){
      view.printStudentDetails(model.getName(), model.getRollNo());
   }
}
- Step 4: Use the StudentController methods to demonstrate MVC design pattern usage MVCPatternDemo.java
public class MVCPatternDemo {
   public static void main(String[] args) {

      //fetch student record based on his roll no from the database
      Student model  = retriveStudentFromDatabase();

      //Create a view : to write student details on console
      StudentView view = new StudentView();

      StudentController controller = new StudentController(model, view);

      controller.updateView();

      //update model data
      controller.setStudentName("John");

      controller.updateView();
   }

   private static Student retriveStudentFromDatabase(){
      Student student = new Student();
      student.setName("Robert");
      student.setRollNo("10");
      return student;
   }
}
- Step 5: Verify the output
Student:
Name: Robert
Roll No: 10
Student:
Name: John
Roll No: 10
Behavior Pattern:Command Pattern
Design
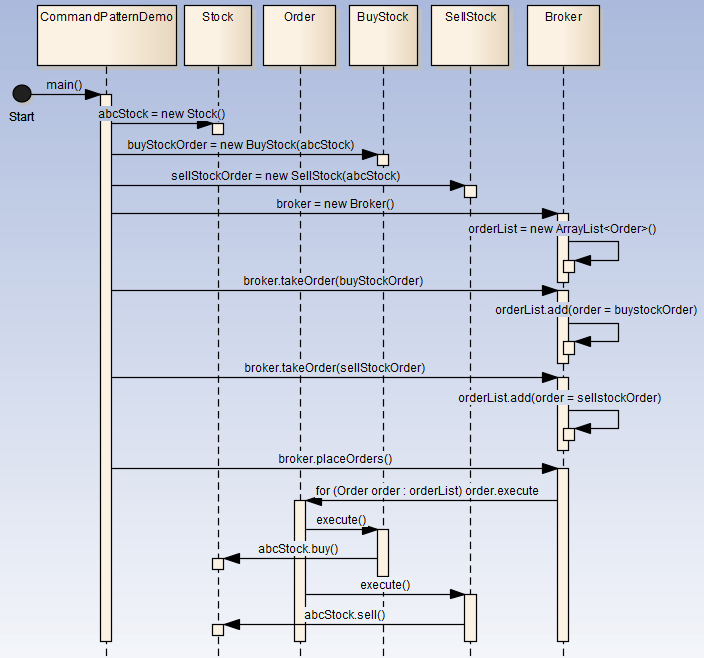
We've created an interface Order which is acting as a command. We've created a Stock class which acts as a request. We've concrete command classes BuyStock and SellStock implementing Order interface which will do actual command processing. A class Broker is created which acts as a invoker object. It can take order and place orders.
Broker object uses command pattern to identify which object will execute which command based on type of command. CommandPatternDemo, our demo class will use Broker class to demonstrate command pattern.


Implementation
- Step 1: Create a command interface Order.java
public interface Order {
   void execute();
}
- Step 2: Create a request class Stock.java
public class Stock {

   private String name = "ABC";
   private int quantity = 10;

   public void buy(){
      System.out.println("Stock [ Name: "+name+",
         Quantity: " + quantity +" ] bought");
   }
   public void sell(){
      System.out.println("Stock [ Name: "+name+",
         Quantity: " + quantity +" ] sold");
   }
}
- Step 3: Create concrete classes implementing the Order interface:
- BuyStock.java
public class BuyStock implements Order {
   private Stock abcStock;

   public BuyStock(Stock abcStock){
      this.abcStock = abcStock;
   }

   public void execute() {
      abcStock.buy();
   }
}
- SellStock.java
public class SellStock implements Order {
   private Stock abcStock;

   public SellStock(Stock abcStock){
      this.abcStock = abcStock;
   }

   public void execute() {
      abcStock.sell();
   }
}
- Step 4: Create command invoker class Broker.java
import java.util.ArrayList;
import java.util.List;

   public class Broker {
   private List<Order> orderList = new ArrayList<Order>();

   public void takeOrder(Order order){
      orderList.add(order);
   }

   public void placeOrders(){
      for (Order order : orderList) {
         order.execute();
      }
      orderList.clear();
   }
}
- Step 5: Use the Broker class to take and execute commands CommandPatternDemo.java
public class CommandPatternDemo {
   public static void main(String[] args) {
      Stock abcStock = new Stock();

      BuyStock buyStockOrder = new BuyStock(abcStock);
      SellStock sellStockOrder = new SellStock(abcStock);

      Broker broker = new Broker();
      broker.takeOrder(buyStockOrder);
      broker.takeOrder(sellStockOrder);

      broker.placeOrders();
   }
}
- Step 6: Verify the output
Stock [ Name: ABC, Quantity: 10 ] bought
Stock [ Name: ABC, Quantity: 10 ] sold
Behavior Pattern: Template Pattern
Define the skeleton of an algorithm in an operation, deferring some steps to subclasses. Template method lets subclasses redefine certain steps of an algorithm without changing the algorithm's structure.
Design
Implementation
- Step 1: Create an abstract class with a template method being final Game.java
public abstract class Game {
   abstract void initialize();
   abstract void startPlay();
   abstract void endPlay();

   //template method
   public final void play(){

      //initialize the game
      initialize();

      //start game
      startPlay();

      //end game
      endPlay();
   }
}
- Step 2: Create concrete classes extending the above class
- Cricket.java
public class Cricket extends Game {

   @Override
   void endPlay() {
      System.out.println("Cricket Game Finished!");
   }

   @Override
   void initialize() {
      System.out.println("Cricket Game Initialized! Start playing.");
   }

   @Override
   void startPlay() {
      System.out.println("Cricket Game Started. Enjoy the game!");
   }
}
    * Football.java<code java>
public class Football extends Game {

   @Override
   void endPlay() {
      System.out.println("Football Game Finished!");
   }

   @Override
   void initialize() {
      System.out.println("Football Game Initialized! Start playing.");
   }

   @Override
   void startPlay() {
      System.out.println("Football Game Started. Enjoy the game!");
   }
}
- Step 4: Verify the output
Cricket Game Initialized! Start playing.
Cricket Game Started. Enjoy the game!
Cricket Game Finished!

Football Game Initialized! Start playing.
Football Game Started. Enjoy the game!
Football Game Finished!


