Table of Contents
Java
Create simple code and run
- Step2: run on windows
set PATH=%PATH%;d:\tools\jdk1.7.0_67\bin
javac helloworld.java
java helloworld
Debug in java
Build debug with command line
Add option -g in javac:
javac -g
Build debug with ant
add debug option in tag javac of build.xml debug=“true”:
<javac srcdir="${src.dir}" destdir="${classes.dir}" classpathref="classpath" debug="true"/>
Debug in code with try catch
try
{
}
catch(Exception e)
{
    e.printStackTrace();
}
We can put try catch in some case below:
- In block main programs or main threads → to throw exeptions and know errors to solve in total the programs. In some cases, threads will stop if any bugs happen ⇒ we can put try catch to prevent the thread stop
- In some basic functions which called multiple times by program → throw exceptions which programmer called wrong
Print Java Object
Config Tab to space in eclipse editor
Java Editor
- Click Window » Preferences
- Expand Java » Code Style
- Click Formatter
- Click the Edit button
- Click the Indentation tab
- Under General Settings, set Tab policy to: Spaces only
- Click OK to apply the changes.
Java Platforms
Java 32bits and 64bits
Which versions of java you should install on 32-bit/64-bit machines?
- Strictly speaking, on a 32-bit CPU architecture machine, you should install 32-bit java/JRE.
- On the other hand, on a 64-bit CPU architecture machine, you are free to choose between 32-bit java/JRE and 64-bit java/JRE. Both will work just fine. In fact, on 64-bit machine decision of JRE version depends on other factors such as maximum memory needed to run your application on high load scenarios.
Can a .class file generated using a 32-bit java compiler be used on 64-bit java?
Absolutely Yes.:
- Java byte code is independent from 32-bit or 64-bit systems. That’s why it is said that the compiled java code shall be executable on “any” system.
- Remember that just the virtual machine is compiled for a special system architecture because of some native files it has in packaged bundle, and native files are never platform independent.
If so, then how 32-bit applications run on 64-bit systems?Answer is that 64-bit systems include a compatibility layer called WoW64, which actually switches the processor back and forth between 32-bit and 64-bit modes depending on which thread needs to execute; making 32-bit software run smoothly even in the 64-bit environment.
Java application on Windows and Linux
Some java application developed with own native libraries. With these own native libraries, they were diffrent in windows and linux. For example: native libraries in windows with extension were .ddl and in linux with extension were .so in windows
Java Syntax
Java Data Types
Java Primitive Data Types
| Data Type | Default Value (for fields) |
|---|---|
| byte | 0 |
| short | 0 |
| int | 0 |
| long | 0L |
| float | 0.0f |
| double | 0.0d |
| char | '\u0000' |
| String (or any object) | null |
| boolean | false |
Java Arrays
- Basic Java Arrays:
byte[] anArrayOfBytes;
short[] anArrayOfShorts;
long[] anArrayOfLongs;
float[] anArrayOfFloats;
double[] anArrayOfDoubles;
boolean[] anArrayOfBooleans;
char[] anArrayOfChars;
String[] anArrayOfStrings;
float anArrayOfFloats[];
- Convert String to Byte Array:
String strCards = "[-47, 1, 16, 84, 2, 101, 110, 83, 111, 109, 101, 32, 78, 70, 67, 32, 68, 97, 116, 97]";      // strCards from the Python script

String[] byteValues = strCards.substring(1, strCards.length() - 1).split(",");
byte[] cards = new byte[byteValues.length];

for (int i=0, len=bytes.length; i<len; i++) {
   cards[i] = Byte.parseByte(byteValues[i].trim());
}
- Java Multi Array:
int[][] multi = new int[5][10];
… which is a short hand for something like this:
int[][] multi = new int[5][];
multi[0] = new int[10];
multi[1] = new int[10];
multi[2] = new int[10];
multi[3] = new int[10];
multi[4] = new int[10];
Note that every element will be initialized to the default value for int, 0, so the above are also equivalent to:
int[][] multi = new int[][]{
  { 0, 0, 0, 0, 0, 0, 0, 0, 0, 0 },
  { 0, 0, 0, 0, 0, 0, 0, 0, 0, 0 },
  { 0, 0, 0, 0, 0, 0, 0, 0, 0, 0 },
  { 0, 0, 0, 0, 0, 0, 0, 0, 0, 0 },
  { 0, 0, 0, 0, 0, 0, 0, 0, 0, 0 }
};
Java Collection with List
refer: https://docs.oracle.com/javase/tutorial/collections/interfaces/index.html
- Create List of double values and sort it
package oata;
import java.util.*;
public class TestList {
  public static void main(String[] args) {
      System.out.println("Hello, World");
      TestList.test1();
  }
  public static void test1(){

      List<Double> testList=new ArrayList();

      testList.add(0.5);
      testList.add(0.2);
      testList.add(0.9);
      testList.add(0.1);
      testList.add(0.1);
      testList.add(0.1);
      testList.add(0.54);
      testList.add(0.71);
      testList.add(0.71);
      testList.add(0.71);
      testList.add(0.92);
      testList.add(0.12);
      testList.add(0.65);
      testList.add(0.34);
      testList.add(0.62);

      Collections.sort(testList);
      System.out.print(testList);
  }
}
output:
Hello, World
[0.1, 0.1, 0.1, 0.12, 0.2, 0.34, 0.5, 0.54, 0.62, 0.65, 0.71, 0.71, 0.71, 0.9, 0.92]
- Create List of object and sort it
package oata;
import java.util.*;
class Card
{
    private int Id;
    public Card()
    {
        super();
        this.Id = 52;
    }

    public int GetNumber()
    {
        return this.Id / 4 + 3;
    }

    public int GetSuit()
    {
        return this.Id % 4;
    }

    public int getType()
    {
        return this.Id / 4;
    }

    public int getShape()
    {
        return this.Id % 4;
    }

    public int getId()
    {
        return this.Id;
    }

    public void setId(int param1)
    {
        this.Id = param1;
    }
}

public class TestList {
    public static void main(String[] args) {
        System.out.println("Hello, World");
        TestList.test2();
    }
    public static void test2()
    {
        List<Card> _lstCards = new ArrayList<Card>();
        Card _tmpCard = new Card();
        _tmpCard.setId(3);
        _lstCards.add(_tmpCard);
        _tmpCard = new Card();
        _tmpCard.setId(5);
        _lstCards.add(_tmpCard);
        _tmpCard = new Card();
        _tmpCard.setId(4);
        _lstCards.add(_tmpCard);
        System.out.println();
        System.out.println("********Test2********");
        System.out.println("Before Sort:");
        for (int i = 0; i < _lstCards.size(); i++)
        {
            System.out.println(_lstCards.get(i).getId());
        }
        System.out.println("After Sort:");
        Comparator<Card> cmp = new Comparator<Card>() {
            @Override
            public int compare(Card o1, Card o2) {
                // TODO Auto-generated method stub
                int cmpval = o1.getId() - o2.getId();
                return cmpval;
            }
        };
        List<Card> lst = new ArrayList<Card>(_lstCards);
        Collections.sort(lst, cmp);
        for (int i = 0; i < lst.size(); i++)
        {
            System.out.println(lst.get(i).getId());
        }
    }
}
output:
********Test2********
Before Sort:
3
5
4
After Sort:
3
4
5
- Update value of List:
public static void test3(){
    List<Card> _lstCards = new ArrayList<Card>();
    Card _tmpCard = new Card();
    _tmpCard.setId(3);
    _lstCards.add(_tmpCard);
    _tmpCard = new Card();
    _tmpCard.setId(5);
    _lstCards.add(_tmpCard);
    _tmpCard = _lstCards.get(0);
    _tmpCard.setId(6);
    for (int i = 0; i < _lstCards.size(); i++)
    {
        System.out.println(_lstCards.get(i).getId());
    }
}
output:
6
5
Convert Array to List
Java String
refer: http://www.tutorialspoint.com/java/java_strings.htm compare 2 strings:
boolean equalsIgnoreCase(String anotherString)
int compareTo(String anotherString)
Java Map
Java Static Methods, Variables, Static Block and Class with Example
refer: http://crunchify.com/java-static-methods-variables-static-block-and-class-with-example/ The static keyword can be used in 3 scenarios:
- static variables
- It is a variable which belongs to the class and not to object(instance)
- Static variables are initialized only once , at the start of the execution . These variables will be initialized first, before the initialization of any instance variables
- A single copy to be shared by all instances of the class
- A static variable can be accessed directly by the class name and doesn’t need any object
- static methods
- It is a method which belongs to the class and not to the object(instance)
- A static method can access only static data. It can not access non-static data (instance variables)
- A static method can call only other static methods and can not call a non-static method from it.
- A static method can be accessed directly by the class name and doesn’t need any object
- static blocks of code: The static block, is a block of statement inside a Java class that will be executed when a class is first loaded in to the JVM
Example:
package com.crunchify.tutorials;

/**
 * @author Crunchify.com
 */

public class CrunchifyStaticDeclaration {

	// 1st static block
	static {
		System.out.println("\nI'm static block 1..");
		setTestString("This is static block's String");
		setTestValue(2);
	}

	// 2nd static blocks in same class
	static {
		System.out.println("\nI'm static block 2..");
	}

	// static variable example
	private static int testValue; // kept private to control it's value through setter

	public int getTestValue() {
		return testValue;
	}

	// static method example
	public static void setTestValue(int testValue) {
		if (testValue > 0)
			CrunchifyStaticDeclaration.testValue = testValue;
		System.out.println("setTestValue method: " + testValue);
	}

	public static String testString;

	/**
	 * @return the testString
	 */
	public static String getTestString() {
		return testString;
	}

	/**
	 * @param testString the testString to set
	 */
	public static void setTestString(String testString) {
		CrunchifyStaticDeclaration.testString = testString;
		System.out.println("setTestString method: " + testString);
	}

	// static util method
	public static int subValue(int i, int... js) {
		int sum = i;
		for (int x : js)
			sum -= x;
		return sum;
	}
}
Advance Java
Random in Java
- Method1: Create Inteter random value between min and max
import java.util.Random;

/**
 * Returns a pseudo-random number between min and max, inclusive.
 * The difference between min and max can be at most
 * Integer.MAX_VALUE - 1.
 *
 * @param min Minimum value
 * @param max Maximum value.  Must be greater than min.
 * @return Integer between min and max, inclusive.
 * @see java.util.Random#nextInt(int)
 */
public static int randInt(int min, int max) {

    // NOTE: This will (intentionally) not run as written so that folks
    // copy-pasting have to think about how to initialize their
    // Random instance.  Initialization of the Random instance is outside
    // the main scope of the question, but some decent options are to have
    // a field that is initialized once and then re-used as needed or to
    // use ThreadLocalRandom (if using at least Java 1.7).
    Random rand = new Random();

    // nextInt is normally exclusive of the top value,
    // so add 1 to make it inclusive
    int randomNum = rand.nextInt((max - min) + 1) + min;

    return randomNum;
}
Because rand.nextInt(value) return random Interteger between 0 and value
- Method2(In Java 1.7 or later)
import java.util.concurrent.ThreadLocalRandom;

// nextInt is normally exclusive of the top value,
// so add 1 to make it inclusive
ThreadLocalRandom.current().nextInt(min, max + 1);
Java Reflection
Java ClassLoader
refer: http://www.onjava.com/pub/a/onjava/2005/01/26/classloading.html
In Java, a class is identified by its fully qualified class name. The fully qualified class name consists of the package name and the class name. But a class is uniquely identified in a JVM using its fully qualified class name along with the instance of the ClassLoader that loaded the class. Thus, if a class named Cl in the package Pg is loaded by an instance kl1 of the class loader KlassLoader, the class instance of C1, i.e. C1.class is keyed in the JVM as (Cl, Pg, kl1). This means that the two class loader instances (Cl, Pg, kl1) and (Cl, Pg, kl2) are not one and the same, and classes loaded by them are also completely different and not type-compatible to each other
Java Json
refer:
- Using json-simple-1.1.1.jar: http://www.tutorialspoint.com/json/json_java_example.htm
- Json org http://json.org with source: https://github.com/stleary/JSON-java
- fast Json
Data types of Json in Json Data(refer http://www.json.org/):
- JsonValue: A value can be a string in double quotes, or a number, or true or false or null, or an object or an array. These structures can be nested.
- JsonObject: An object is an unordered set of name/value pairs. An object begins with { (left brace) and ends with } (right brace). Each name is followed by : (colon) and the name/value pairs are separated by , (comma).
- JsonArray: An array is an ordered collection of values. An array begins with [ (left bracket) and ends with ] (right bracket). Values are separated by , (comma).
- JsonString: A string is a sequence of zero or more Unicode characters, wrapped in double quotes, using backslash escapes. A character is represented as a single character string. A string is very much like a C or Java string.
- JsonNumber: A number is very much like a C or Java number, except that the octal and hexadecimal formats are not used.
JsonObject, JsonArray, JsonString, and JsonNumber are subtypes of JsonValue. These are constants defined in the API for null, true, and false JSON values.
Java json org
Java Fast Json
refer links:
Some Basic Examples
- Create JSON Object
- Update Json Object:With Json data below
{
 "person":{"name":"Sam", "surname":"ngonma"},
 "car":{"make":"toyota", "model":"yaris"}
 }
We can update JSON Object
JSONObject person =  jsonArray.getJSONObject(0).getJSONObject("person");
person.put("name", "Sammie");
- Create and Update JSON Object
    private void updateJson(JSONObject mapChannels, int i){
        String channelId = Integer.toString(i);
        String bets = m_channels.get(i).getBets();
        String betsAdvange = m_channels.get(i).getBetsAdvange();
        JSONObject channelObj = mapChannels.getJSONObject(channelId);
        channelObj.put("bets", JSON.parseArray(bets));
        channelObj.put("betsAdvange", JSON.parseArray(betsAdvange));
        mapChannels.put(channelId, channelObj);
    }
    public String channels2Json(){
        JSONObject returnObj = new JSONObject();
        JSONObject objChannels = new JSONObject();
        objChannels.put("maxChannel", m_channels.size());
        for(int i = 0; i < m_channels.size(); i++)
        {
            Channel channel = m_channels.get(i);
            objChannels.put(Integer.toString(i), channel);
            updateJson(objChannels, i);
        }
        returnObj.put("Channel", new JSONObject(objChannels));
        return returnObj.toJSONString();
    }
Concurrency
Java Threads Objects
Provide a Runnable object
The Runnable interface defines a single method run, meant to contain the code executed in the thread. The Runnable object is passed to the Thread constructor, as in the HelloRunnable example:
public class HelloRunnable implements Runnable {

    public void run() {
        System.out.println("Hello from a thread!");
    }

    public static void main(String args[]) {
        (new Thread(new HelloRunnable())).start();
    }

}
output:
Hello from a thread!
Subclass Thread
The Thread class itself implements Runnable, though its run method does nothing. An application can subclass Thread, providing its own implementation of run, as in the HelloThread example:
public class HelloThread extends Thread {

    public void run() {
        System.out.println("Hello from a thread!");
    }

    public static void main(String args[]) {
        (new HelloThread()).start();
    }
}
output:
Hello from a thread!
Synchronization
(Only in case application with Multithread(Not single application)) refer:https://docs.oracle.com/javase/tutorial/essential/concurrency/sync.html
Threads communicate primarily by sharing access to fields and the objects reference fields refer to. This form of communication is extremely efficient, but makes two kinds of errors possible: thread interference and memory consistency errors. The tool needed to prevent these errors is synchronization.
- Thread Interference describes how errors are introduced when multiple threads access shared data.
- Memory Consistency Errors describes errors that result from inconsistent views of shared memory.
- Synchronized Methods describes a simple idiom that can effectively prevent thread interference and memory consistency errors.
public class SynchronizedCounter {
    private int c = 0;

    public synchronized void increment() {
        c++;
    }

    public synchronized void decrement() {
        c--;
    }

    public synchronized int value() {
        return c;
    }
}
- Implicit Locks and Synchronization describes a more general synchronization idiom, and describes how synchronization is based on implicit locks.
- Method1:
public void addName(String name) {
    synchronized(this) {
        lastName = name;
        nameCount++;
    }
    nameList.add(name);
}
- Atomic Access talks about the general idea of operations that can't be interfered with by other threads.
High level Concurrency Objects
refer: https://docs.oracle.com/javase/tutorial/essential/concurrency/highlevel.html
- Lock objects support locking idioms that simplify many concurrent applications.
- Executors define a high-level API for launching and managing threads. Executor implementations provided by java.util.concurrent provide thread pool management suitable for large-scale applications.
- Concurrent collections make it easier to manage large collections of data, and can greatly reduce the need for synchronization.
- Atomic variables have features that minimize synchronization and help avoid memory consistency errors.
- ThreadLocalRandom (in JDK 7) provides efficient generation of pseudorandom numbers from multiple threads.
Thread pools
 refer:
Thread pools address two different problems:
- They usually provide improved performance when executing large numbers of asynchronous tasks, due to reduced per-task invocation overhead
- And they provide a means of bounding and managing the resources, including threads, consumed when executing a collection of tasks
public class ThreadPoolExecutor extends AbstractExecutorService {
.......................
    private static int workerCountOf(int c)  { return c & CAPACITY; }
    private static boolean isRunning(int c) {
        return c < SHUTDOWN;
    }
    public void execute(Runnable command) {
        if (command == null)
            throw new NullPointerException();
        /*
         * Proceed in 3 steps:
         *
         * 1. If fewer than corePoolSize threads are running, try to
         * start a new thread with the given command as its first
         * task.  The call to addWorker atomically checks runState and
         * workerCount, and so prevents false alarms that would add
         * threads when it shouldn't, by returning false.
         *
         * 2. If a task can be successfully queued, then we still need
         * to double-check whether we should have added a thread
         * (because existing ones died since last checking) or that
         * the pool shut down since entry into this method. So we
         * recheck state and if necessary roll back the enqueuing if
         * stopped, or start a new thread if there are none.
         *
         * 3. If we cannot queue task, then we try to add a new
         * thread.  If it fails, we know we are shut down or saturated
         * and so reject the task.
         */
        int c = ctl.get();
        if (workerCountOf(c) < corePoolSize) {
            if (addWorker(command, true))
                return;
            c = ctl.get();
        }
        if (isRunning(c) && workQueue.offer(command)) {
            int recheck = ctl.get();
            if (! isRunning(recheck) && remove(command))
                reject(command);
            else if (workerCountOf(recheck) == 0)
                addWorker(null, false);
        }
        else if (!addWorker(command, false))
            reject(command);
    }
.......................
Example for Thread Pool: with 100 tasks, we want to run them using ideally 10, and maximum 20 threads:
- Step1: Create new thread DemoThread.java:
public class DemoThread implements Runnable
{
    private String name = null;

    public DemoThread(String name) {
        this.name = name;
    }

    public String getName() {
        return this.name;
    }

    @Override
    public void run() {
        try {
            Thread.sleep(500);
        } catch (InterruptedException e) {
            e.printStackTrace();
        }
        System.out.println("Executing : " + name);
    }
}
- Step2: Create new thread pool CustomThreadPoolExecutor.java
import java.util.concurrent.BlockingQueue;
import java.util.concurrent.ThreadPoolExecutor;
import java.util.concurrent.TimeUnit;

public class CustomThreadPoolExecutor extends ThreadPoolExecutor {

    public CustomThreadPoolExecutor(int corePoolSize, int maximumPoolSize,
            long keepAliveTime, TimeUnit unit, BlockingQueue<Runnable> workQueue) {
        super(corePoolSize, maximumPoolSize, keepAliveTime, unit, workQueue);
    }

    @Override
    protected void beforeExecute(Thread t, Runnable r) {
        super.beforeExecute(t, r);
        System.out.println("Perform beforeExecute() logic");
    }

    @Override
    protected void afterExecute(Runnable r, Throwable t) {
        super.afterExecute(r, t);
        if (t != null) {
            System.out.println("Perform exception handler logic");
        }
        System.out.println("Perform afterExecute() logic");
    }

}
- Step3:Create application DemoExecutor.java excute thread pool
import java.util.concurrent.ArrayBlockingQueue;
import java.util.concurrent.BlockingQueue;
import java.util.concurrent.RejectedExecutionHandler;
import java.util.concurrent.ThreadPoolExecutor;
import java.util.concurrent.TimeUnit;

public class DemoExecutor
{
    public static void main(String[] args)
    {
        Integer threadCounter = 0;
        BlockingQueue<Runnable> blockingQueue = new ArrayBlockingQueue<Runnable>(50);

        CustomThreadPoolExecutor executor = new CustomThreadPoolExecutor(10,
                                            20, 5000, TimeUnit.MILLISECONDS, blockingQueue);

        executor.setRejectedExecutionHandler(new RejectedExecutionHandler() {
            @Override
            public void rejectedExecution(Runnable r,
                    ThreadPoolExecutor executor) {
                System.out.println("DemoTask Rejected : "
                        + ((DemoThread) r).getName());
                System.out.println("Waiting for a second !!");
                try {
                    Thread.sleep(1000);
                } catch (InterruptedException e) {
                    e.printStackTrace();
                }
                System.out.println("Lets add another time : "
                        + ((DemoThread) r).getName());
                executor.execute(r);
            }
        });
        // Let start all core threads initially
        executor.prestartAllCoreThreads();
        while (true) {
            threadCounter++;
            // Adding threads one by one
            System.out.println("Adding DemoTask : " + threadCounter);
            executor.execute(new DemoThread(threadCounter.toString()));

            if (threadCounter == 100)
                break;
        }
    }

}
- Step4: Compile and run
javac DemoExecutor.java
run:
java DemoExecutor
Hibernate
refer:
Hibernate Application Architecture
refer: http://www.tutorialspoint.com/hibernate/hibernate_architecture.htm
High level view of the Hibernate Application Architecture:

Detailed view of the Hibernate Application Architecture with few important core classes:

- SessionFactory: The SessionFactory is a thread safe object(not conflict when multi threads use it) and used by all the threads of an application. The SessionFactory is heavyweight object so usually it is created during application start up and kept for later use. You would need one SessionFactory object per database using a separate configuration file. So if you are using multiple databases then you would have to create multiple SessionFactory objects.
- Session: A Session is used to get a physical connection with a database. The Session object is lightweight and designed to be instantiated each time an interaction is needed with the database. Persistent objects are saved and retrieved through a Session object. The session objects should not be kept open for a long time because they are not usually thread safe and they should be created and destroyed them as needed. → Multiple session objects will be multiple physical connection with a database
<property name="hibernate.connection.pool_size">100</property>
Install Hibernate Tools
refer: http://hibernate.org/tools/ Install:(You must use Eclipse 3.6 to install Hibernate tool)
- Install with plugin via eclipse: Go to Help > Eclipse Marketplace, and search “JBoss Tools (Luna)“ to install jboss tools for eclipse(with eclipse new version)
- Or Install with plugin via eclipse: Go to “Help” » “Install New Software …” with software url: http://download.jboss.org/jbosstools/updates/stable/helios/(with eclipse old version)
- Or Install Single app Jboss Developer: download from http://tools.jboss.org/downloads/devstudio/luna/8.1.0.GA.html
Simple Application with Hibernate
Phase1: Create Simple Code using Hibernate
- Step1: Using maven to create project hibernate with package hibernate.tutorials:
mvn archetype:generate -DgroupId=hibernate.tutorials -DartifactId=hibernate -DarchetypeArtifactId=maven-archetype-quickstart -DinteractiveMode=false
- Step2: Create java POJO class Employee.java(A POJO (Plain Old Java Object) is a Java object that doesn't extend or implement some specialized classes and interfaces respectively required by the EJB framework)
package hibernate.tutorials;
public class Employee {
   private int id;
   private String firstName;
   private String lastName;
   private int salary;

   public Employee() {}
   public Employee(String fname, String lname, int salary) {
      this.firstName = fname;
      this.lastName = lname;
      this.salary = salary;
   }
   public int getId() {
      return id;
   }
   public void setId( int id ) {
      this.id = id;
   }
   public String getFirstName() {
      return firstName;
   }
   public void setFirstName( String first_name ) {
      this.firstName = first_name;
   }
   public String getLastName() {
      return lastName;
   }
   public void setLastName( String last_name ) {
      this.lastName = last_name;
   }
   public int getSalary() {
      return salary;
   }
   public void setSalary( int salary ) {
      this.salary = salary;
   }
}
- Step3: Create Mapping Configuration File for table EMPLOYEE that instructs Hibernate how to map the defined class or classes to the database tables. You should save the mapping document in a file with the format <classname>.hbm.xml(employee.hbm.xml)(save the file to directory src\main\java\hibernate\tutorials\:
<?xml version="1.0" encoding="utf-8"?>
<!DOCTYPE hibernate-mapping PUBLIC
 "-//Hibernate/Hibernate Mapping DTD//EN"
 "http://www.hibernate.org/dtd/hibernate-mapping-3.0.dtd">

<hibernate-mapping>
   <class name="hibernate.tutorials.Employee" table="EMPLOYEE">
      <meta attribute="class-description">
         This class contains the employee detail.
      </meta>
      <id name="id" type="int" column="id">
         <generator class="native"/>
      </id>
      <property name="firstName" column="first_name" type="string"/>
      <property name="lastName" column="last_name" type="string"/>
      <property name="salary" column="salary" type="int"/>
   </class>
</hibernate-mapping>
option class name=“hibernate.tutorials.Employee” ⇒ Must be Full name of Class as hibernate.tutorials.Employee, not name Employee. Fix error below
sessionFactory object.org.hibernate.MappingException: entity class not found
- Step4: Create Application Class ManageEmployee.java
package hibernate.tutorials;
import java.util.List;
import java.util.Date;
import java.util.Iterator;

import org.hibernate.HibernateException;
import org.hibernate.Session;
import org.hibernate.Transaction;
import org.hibernate.SessionFactory;
import org.hibernate.cfg.Configuration;

public class ManageEmployee {
   private static SessionFactory factory;
   public static void main(String[] args) {
      try{
         factory = new Configuration().configure().buildSessionFactory();
      }catch (Throwable ex) {
         System.err.println("Failed to create sessionFactory object." + ex);
         throw new ExceptionInInitializerError(ex);
      }
      ManageEmployee ME = new ManageEmployee();

      /* Add few employee records in database */
      Integer empID1 = ME.addEmployee("Zara", "Ali", 1000);
      Integer empID2 = ME.addEmployee("Daisy", "Das", 5000);
      Integer empID3 = ME.addEmployee("John", "Paul", 10000);

      /* List down all the employees */
      ME.listEmployees();

      /* Update employee's records */
      ME.updateEmployee(empID1, 5000);

      /* Delete an employee from the database */
      ME.deleteEmployee(empID2);

      /* List down new list of the employees */
      ME.listEmployees();
   }
   /* Method to CREATE an employee in the database */
   public Integer addEmployee(String fname, String lname, int salary){
      Session session = factory.openSession();
      Transaction tx = null;
      Integer employeeID = null;
      try{
         tx = session.beginTransaction();
         Employee employee = new Employee(fname, lname, salary);
         employeeID = (Integer) session.save(employee);
         tx.commit();
      }catch (HibernateException e) {
         if (tx!=null) tx.rollback();
         e.printStackTrace();
      }finally {
         session.close();
      }
      return employeeID;
   }
   /* Method to  READ all the employees */
   public void listEmployees( ){
      Session session = factory.openSession();
      Transaction tx = null;
      try{
         tx = session.beginTransaction();
         List employees = session.createQuery("FROM Employee").list();
         for (Iterator iterator =
                           employees.iterator(); iterator.hasNext();){
            Employee employee = (Employee) iterator.next();
            System.out.print("First Name: " + employee.getFirstName());
            System.out.print("  Last Name: " + employee.getLastName());
            System.out.println("  Salary: " + employee.getSalary());
         }
         tx.commit();
      }catch (HibernateException e) {
         if (tx!=null) tx.rollback();
         e.printStackTrace();
      }finally {
         session.close();
      }
   }
   /* Method to UPDATE salary for an employee */
   public void updateEmployee(Integer EmployeeID, int salary ){
      Session session = factory.openSession();
      Transaction tx = null;
      try{
         tx = session.beginTransaction();
         Employee employee =
                    (Employee)session.get(Employee.class, EmployeeID);
         employee.setSalary( salary );
		 session.update(employee);
         tx.commit();
      }catch (HibernateException e) {
         if (tx!=null) tx.rollback();
         e.printStackTrace();
      }finally {
         session.close();
      }
   }
   /* Method to DELETE an employee from the records */
   public void deleteEmployee(Integer EmployeeID){
      Session session = factory.openSession();
      Transaction tx = null;
      try{
         tx = session.beginTransaction();
         Employee employee =
                   (Employee)session.get(Employee.class, EmployeeID);
         session.delete(employee);
         tx.commit();
      }catch (HibernateException e) {
         if (tx!=null) tx.rollback();
         e.printStackTrace();
      }finally {
         session.close();
      }
   }
}
Phase2: Config Hibernate connect MySQL Database
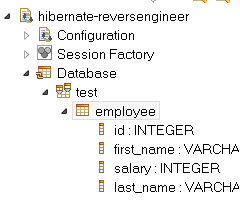
- Step1: Create database test and table EMPLOYEE with sql script below:
CREATE TABLE EMPLOYEE (
   id INT NOT NULL AUTO_INCREMENT,
   first_name VARCHAR(20) DEFAULT NULL,
   last_name  VARCHAR(20) DEFAULT NULL,
   salary     INT  DEFAULT NULL,
   PRIMARY KEY (id)
);
- Step2: Create hibernate.cfg.xml in directory src\main\java\
<?xml version="1.0" encoding="utf-8"?>
<!DOCTYPE hibernate-configuration SYSTEM
"http://www.hibernate.org/dtd/hibernate-configuration-3.0.dtd">

<hibernate-configuration>
   <session-factory>
   <property name="hibernate.dialect">
      org.hibernate.dialect.MySQLDialect
   </property>
   <property name="hibernate.connection.driver_class">
      com.mysql.jdbc.Driver
   </property>

   <!-- Assume test is the database name -->
   <property name="hibernate.connection.url">
      jdbc:mysql://localhost/test
   </property>
   <property name="hibernate.connection.username">
      root
   </property>
   <property name="hibernate.connection.password">
      root123
   </property>

   <!-- List of XML mapping files -->
   <mapping resource="hibernate/tutorials/Employee.hbm.xml"/>

</session-factory>
</hibernate-configuration>
which contain mapping xml for table Employee: <mapping resource=“hibernate/tutorials/Employee.hbm.xml”/>
Phase3: Config build and run
- Step1: Add options in pom.xml
<project>
.......
  <build>
    <resources>
      <resource>
        <directory>src/main/java</directory>
        <includes>
          <include>**/*.xml</include>
        </includes>
      </resource>
    </resources>
  </build>
.......
  <dependencies>
.......
    <dependency>
      <groupId>org.hibernate</groupId>
      <artifactId>hibernate-core</artifactId>
      <version>4.3.10.Final</version>
    </dependency>
    <dependency>
      <groupId>mysql</groupId>
      <artifactId>mysql-connector-java</artifactId>
      <version>5.1.6</version>
    </dependency>
  </dependencies>
.......
</project>
Explain options for compiling with maven:
- Resource directory which contain xml configs: resources
- Using dependency hibernate-core, mysql-connector-java
- Step2: Build and Run:
mvn compile
mvn exec:java -Dexec.mainClass="hibernate.tutorials.ManageEmployee"
Hibernate Config encoding UTF8
<?xml version="1.0" encoding="UTF-8"?>
<!DOCTYPE hibernate-configuration PUBLIC
		"-//Hibernate/Hibernate Configuration DTD 3.0//EN"
		"http://www.hibernate.org/dtd/hibernate-configuration-3.0.dtd">
<hibernate-configuration>
    <session-factory name="cardfactory">
        <property name="hibernate.connection.driver_class">com.mysql.jdbc.Driver</property>
        <property name="hibernate.dialect">org.hibernate.dialect.MySQLDialect</property>
        <property name="hibernate.connection.username">root</property>
        <property name="hibernate.connection.password">xxxxx</property>
        <property name="hibernate.connection.url">jdbc:mysql:///cardgame?useUnicode=true;characterEncoding=utf-8</property>
        <property name="hibernate.connection.CharSet">utf8</property>
        <property name="hibernate.connection.characterEncoding">utf8</property>
        <property name="hibernate.connection.useUnicode">true</property>
        <property name="current_session_context_class">thread</property>
    </session-factory>
</hibernate-configuration>
With options for encoding UTF-8:
<property name="hibernate.connection.url">jdbc:mysql:///cardgame?useUnicode=true;characterEncoding=utf-8</property>
<property name="hibernate.connection.CharSet">utf8</property>
<property name="hibernate.connection.characterEncoding">utf8</property>
<property name="hibernate.connection.useUnicode">true</property>
Some basic query functions in Hibernate
First, we need to create object SesstionFactory:
factory = new Configuration().configure().buildSessionFactory();
- Add an new record
/* Method to CREATE an employee in the database */
public Integer addEmployee(String fname, String lname, int salary){
   Session session = factory.openSession();
   Transaction tx = null;
   Integer employeeID = null;
   try{
      tx = session.beginTransaction();
      Employee employee = new Employee(fname, lname, salary);
      employeeID = (Integer) session.save(employee);
      tx.commit();
   }catch (HibernateException e) {
      if (tx!=null) tx.rollback();
      e.printStackTrace();
   }finally {
      session.close();
   }
   return employeeID;
}
- read all records base on query :
/* Method to  READ all the employees */
public void listEmployees( ){
   Session session = factory.openSession();
   Transaction tx = null;
   try{
      tx = session.beginTransaction();
      List employees = session.createQuery("FROM Employee").list();
      for (Iterator iterator = employees.iterator(); iterator.hasNext();){
         Employee employee = (Employee) iterator.next();
         System.out.print("First Name: " + employee.getFirstName());
         System.out.print("  Last Name: " + employee.getLastName());
         System.out.println("  Salary: " + employee.getSalary());
      }
      tx.commit();
   }catch (HibernateException e) {
      if (tx!=null) tx.rollback();
      e.printStackTrace();
   }finally {
      session.close();
   }
}
- query record base on ID(Primary key) and update field salary of it:
/* Method to UPDATE salary for an employee */
public void updateEmployee(Integer EmployeeID, int salary ){
   Session session = factory.openSession();
   Transaction tx = null;
   try{
      tx = session.beginTransaction();
      Employee employee =
                 (Employee)session.get(Employee.class, EmployeeID);
      employee.setSalary( salary );
    session.update(employee);
      tx.commit();
   }catch (HibernateException e) {
      if (tx!=null) tx.rollback();
      e.printStackTrace();
   }finally {
      session.close();
   }
}
- delete an record base on ID(primary key)
/* Method to DELETE an employee from the records */
public void deleteEmployee(Integer EmployeeID){
   Session session = factory.openSession();
   Transaction tx = null;
   try{
      tx = session.beginTransaction();
      Employee employee =
                (Employee)session.get(Employee.class, EmployeeID);
      session.delete(employee);
      tx.commit();
   }catch (HibernateException e) {
      if (tx!=null) tx.rollback();
      e.printStackTrace();
   }finally {
      session.close();
   }
}
Custom query functions in Hibernate
Config Hibernate insert sql defaul values
refer: http://www.mkyong.com/hibernate/hibernate-dynamic-insert-attribute-example/
You can configure the dynamic-insert=“true” properties value through annotation or XML mapping file:
- Annotation
@Entity
@Table(name = "stock_transaction", catalog = "mkyong")
@org.hibernate.annotations.Entity(
		dynamicInsert = true
)
public class StockTransaction implements java.io.Serializable {
- OR XML mapping(in *.hbm.xml file)
<class ... table="stock_transaction" catalog="mkyong" dynamic-insert="true">
        <id name="tranId" type="java.lang.Integer">
            <column name="TRAN_ID" />
            <generator class="identity" />
        </id>
Hibernate Batch processing
http://docs.jboss.org/hibernate/orm/4.3/manual/en-US/html/ch15.html
A naive approach to inserting 100,000 rows in the database using Hibernate might look like this:
Session session = sessionFactory.openSession();
Transaction tx = session.beginTransaction();
for ( int i=0; i<100000; i++ ) {
    Customer customer = new Customer(.....);
    session.save(customer);
}
tx.commit();
session.close();
⇒ This would fall over with an OutOfMemoryException somewhere around the 50,000th row. That is because Hibernate caches all the newly inserted Customer instances in the session-level cache. In below example, we will show you how to avoid this problem:
First set the property:
hibernate.jdbc.batch_size 20
And use batch scripts below:
- Insert Batch
Session session = sessionFactory.openSession();
Transaction tx = session.beginTransaction();

for ( int i=0; i<100000; i++ ) {
    Customer customer = new Customer(.....);
    session.save(customer);
    if ( i % 20 == 0 ) { //20, same as the JDBC batch size
        //flush a batch of inserts and release memory:
        session.flush();
        session.clear();
    }
}

tx.commit();
session.close();
- Batch Update
Session session = sessionFactory.openSession();
Transaction tx = session.beginTransaction();

ScrollableResults customers = session.getNamedQuery("GetCustomers")
    .setCacheMode(CacheMode.IGNORE)
    .scroll(ScrollMode.FORWARD_ONLY);
int count=0;
while ( customers.next() ) {
    Customer customer = (Customer) customers.get(0);
    customer.updateStuff(...);
    if ( ++count % 20 == 0 ) {
        //flush a batch of updates and release memory:
        session.flush();
        session.clear();
    }
}

tx.commit();
session.close();
Custom Configure
Hibernate map editor
Hibernate reverseengineering tool
refer:
Steps by steps to use reverseengineering tool in eclipse:
- Step1: Create Hibernate configuration file(hibernate.cfg.xml) for project: right click project name → New → Hibernate Configuration File(.cfg.xml)
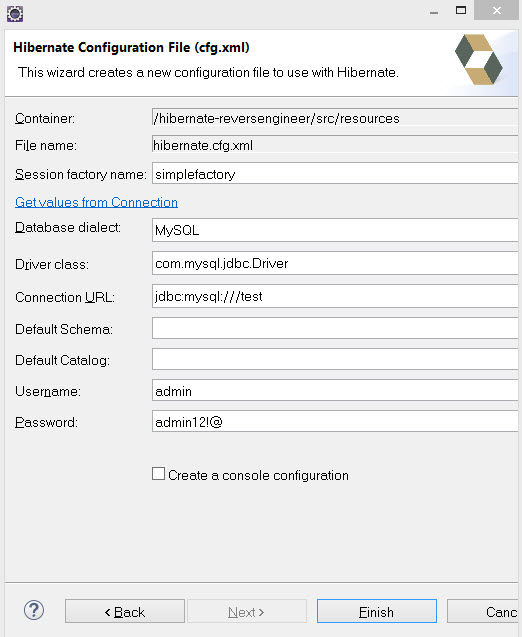
with some basic informations below:- database name: test
- username: admin
- password: admin12!@
- Step2: Create Hibernate Console Configuration: A Console configuration describes how the Hibernate plugin should configure Hibernate and what configuration files and classpaths are needed to load the POJO's, JDBC drivers etc. It is required to make use of query prototyping, reverse engineering and code generation
- Step3: view Hibernate Console Configuration created from Step2. Go to window→show view→Hibernate Configurations
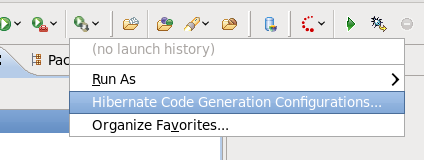
- Step4: Create configuration for Hibernate code generator
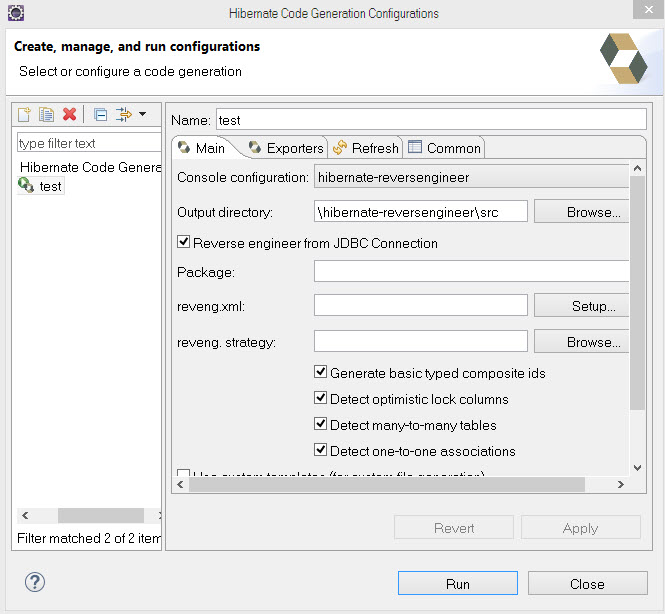
- Step5: Config Main for Hibernate code generator
- Check option Reverse engineer from JDBC Connection
- And enter package name, for example: vn.casino.entities
- Step6: Config Export for Hibernate code generator: Check 2 options Domain Code and Hibernate XML Mappings:
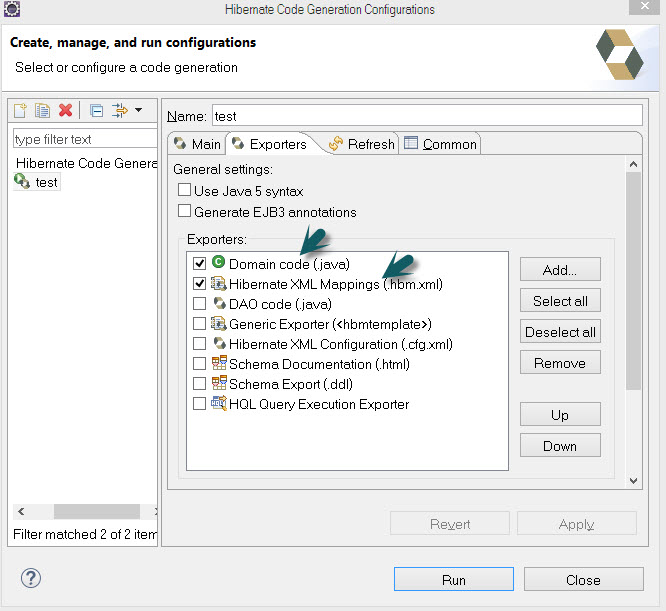 Note: You add option Hibernate XML Configuration to generate hibernate.cfg.xml
 - Step7: Click Run to generate java code and Hibernate XML Mappings


Hibernate Foreign key Using XML mapping
refer:
Hibernate log
You need to config display log for package org.hibernate with log4j to check hibernate log
# org.hibernate FileAppender
log4j.appender.hibernateAppender=org.apache.log4j.DailyRollingFileAppender
log4j.appender.hibernateAppender.layout=org.apache.log4j.PatternLayout
log4j.appender.hibernateAppender.File=logs/cardgameExt/hibernate.log
log4j.appender.hibernateAppender.layout.ConversionPattern=%d{dd MMM yyyy | HH:mm:ss,SSS} | %-5p | %t | %c{3} | %3x | %m%n
log4j.appender.hibernateAppender.Encoding=UTF-8
log4j.appender.hibernateAppender.DatePattern='.'yyyy-MM-dd
log4j.category.org.hibernate=INFO,consoleAppender,hibernateAppender
Java Connection Pool
Connection pooling is the technique used to increase the performance of the application when an Connection pooling takes care of managing connections(prepare,open and close)
- Connection Pool API is responsible for opening N connections and leave them ready for our application.
- Our application will just ask for the pool to get a new connection, it will use it and then deliver it back to the Pool.
- If a connection is stale, the pooling mechanism would then close it and re-open a new one.
- This way we can use the connections in a more better way, as we no need to wait for the connection to be established during the actual execution of our code and we don’t have to worry about stale connections
refer:


Default Hibernate connection pooling
Below are basic steps config for connections in Hibernate(each connection in MySQL was a session in Hibernate)(refer: https://docs.jboss.org/hibernate/stable/core.old/reference/en/html/configuration-hibernatejdbc.html):
- Config max connections in MySQL:
- config temporary in MySQL Admin console:
SET GLOBAL MAX_CONNECTIONS = 200;
- config in my.cnf or my.ini of MySQL:
MAX_CONNECTIONS = 200
- Config max pool connections:
<property name="hibernate.connection.pool_size">100</property>
- coding to close session after call(in doWork() function):
public class DBConnection {
    private static SessionFactory factory;
    static {
        factory = new Configuration().configure().buildSessionFactory();
    }
    public Session getSession() {
        return factory.openSession();
    }

    public void doWork() {
        Session session = getSession();
        // do work.
        session.close();
    }
    // Call this during shutdown
    public static void close() {
        factory.close();
    }
}
Most important Hibernate JDBC properties:
<property name="hibernate.connection.driver_class">com.mysql.jdbc.Driver</property>
<property name="hibernate.dialect">org.hibernate.dialect.MySQLDialect</property>
<property name="hibernate.connection.username">root</property>
<property name="hibernate.connection.password">secret</property>
<property name="hibernate.connection.url">jdbc:mysql:///cardgame?useUnicode=true;characterEncoding=utf-8</property>
<property name="hibernate.connection.pool_size">1</property>
⇒ Hibernate's internal connection pooling algorithm is rudimentary, and is provided for development and testing purposes. Use a third-party pool for best performance and stability. To use a third-party pool, replace the hibernate.connection.pool_size property with settings specific to your connection pool of choice. This disables Hibernate's internal connection pool.
org.hibernate.connection.C3P0ConnectionProvider with c3p0 connection pool
refer:
- Configuration c3p0: http://www.mchange.com/projects/c3p0/#configuration
- org.hibernate.connection Interface ConnectionProvider
public interface ConnectionProvider
A strategy for obtaining JDBC connections.

Implementors might also implement connection pooling.

The ConnectionProvider interface is not intended to be exposed to the application. Instead it is used internally by Hibernate to obtain connections.
 void	close()
          Release all resources held by this provider.
 void	closeConnection(Connection conn)
          Dispose of a used connection.
 void	configure(Properties props)
          Initialize the connection provider from given properties.
 Connection	getConnection()
          Grab a connection, with the autocommit mode specified by hibernate.connection.autocommit.
 boolean	supportsAggressiveRelease()
          Does this connection provider support aggressive release of JDBC connections and re-acquistion of those connections (if need be) later?
This is used in conjunction with org.hibernate.cfg.Environment.RELEASE_CONNECTIONS to aggressively release JDBC connections.
- org.hibernate.connection.C3P0ConnectionProvider https://github.com/hibernate/hibernate-orm/tree/741b6b71f1552aa224fb61d38b85b32e0b8a19b4/hibernate-c3p0 → Integration for c3p0 Connection pooling into Hibernate ORM
import javax.sql.DataSource;
import com.mchange.v2.c3p0.DataSources;
.....
public class C3P0ConnectionProvider
		implements ConnectionProvider, Configurable, Stoppable, ServiceRegistryAwareService {
.....
	private DataSource ds;
	@Override
	public Connection getConnection() throws SQLException {
		final Connection c = ds.getConnection();
.....
	@Override
	public void configure(Map<String, Object> props) {
.....
		final DataSource unpooled = DataSources.unpooledDataSource( jdbcUrl, connectionProps );
		ds = DataSources.pooledDataSource( unpooled, allProps );
.....
	@Override
	public void stop() {
		try {
			DataSources.destroy( ds );
		}
		catch (SQLException sqle) {
			C3P0_MSG_LOGGER.unableToDestroyC3p0ConnectionPool( sqle );
		}
	}
With Datasources from c3p0 source https://github.com/swaldman/c3p0/blob/master/src/java/com/mchange/v2/c3p0/DataSources.java
Download jar for using hibernate c3p0:
- Step1: Download hibernate-c3p0-4.2.2.final.jar
- Step2: Download c3p0-0.9.5.2.jar & mchange-commons-java-0.2.11.jar
Hibernate uses its org.hibernate.service.jdbc.connections.internal.C3P0ConnectionProvider for connection pooling if you set the hibernate.c3p0.* properties. properties.
<property name="hibernate.connection.provider_class">org.hibernate.connection.C3P0ConnectionProvider</property>
<property name="hibernate.c3p0.min_size">5</property>
<property name="hibernate.c3p0.max_size">20</property>
<property name="hibernate.c3p0.timeout">2000</property>
<property name="hibernate.c3p0.max_statements">1000</property>
⇒ You need to turn on hibernate log to check debug log and error log when using c3p0 pool Some basic pool configuration in hibernate-c3p0:
- connnection pool:
<property name="hibernate.c3p0.min_size">5</property>
<property name="hibernate.c3p0.max_size">20</property>
- Global statements pool(statements cached):
<property name="hibernate.c3p0.max_statements">1000</property>
Using external libraries for coding java with eclipse
Install JDBC driver for eclipse
refer: http://books.zkoss.org/wiki/Setup_MySQL_DB_in_Eclipse
- Step1: Download and Install MySQL Connector from http://dev.mysql.com/downloads/connector/j/. MySQL Connector will be installed to directory C:\Program Files (x86)\MySQL\MySQL Connector J
- Step2: Using Eclipse to choose the data resources for MySQL Connection via [Window]/[Show View]/[Data Management]/[Data Source Explorer]
Using slf4j
- download: http://www.slf4j.org/download.html
- jar to add for external libraries:
slf4j-api-1.7.12.jar
- import:
import org.slf4j.Logger;
import org.slf4j.LoggerFactory;
Using commons.apache
- jar files to add for external libraries:
commons-lang3-3.4.jar
- import:
import org.apache.commons.lang3.*
Fix java errors
Eclipse build errors - java.lang.object cannot be resolved
Eclipse build errors - java.lang.object cannot be resolved. Fix:
- Go to properties of project with the build error (right click > Properties)
- View the “Libraries” tab in the “Build Path” section
- Find the “JRE System Library” in the list (if this is missing then this error message is not an eclipse bug but a mis-configured project)
- Remove the “JRE System Library”
- Hit “Add Library …”, Select “JRE System Library” and add the appropriate JRE for the project (eg. 'Workspace default JRE')
- Hit “Finish” in the library selection and “OK” in the project properties and then wait for the re-build of the project
Eclipse build errors - java.lang.UnsupportedClassVersionError
Eclipse build errors - java.lang.UnsupportedClassVersionError ⇒ Seems like you are using JDK8 for compiling and Lower version for running it. Fix:
- Step1: Install jdk 1.6
- Step2: Go to Window > Preferences > Java > Compiler > compiler level change Compiler Compliance level to 1.6. Then change configure at bottom of dialog point to path of jdk1.6
Hibernate error procedure can't return a result set in the given context
Hibernate call procedure error:
procedure can't return a result set in the given context
Because the jar required for the MySQL DB connectivity was old. Simply upgrade this jar version(MySQL-Connector) to mysql-connector-java-5.1.12-bin.jar and exception gets removed.
Hibernate error HHH000277: Could not bind factory to JNDI
Fix: In Hibernate Configuration, remove the session-factory name. Try using only
<session-factory>
   <!-- ... -->
</session-factory>
java.lang.UnsupportedClassVersionError : Unsupported major.minor version 52.0
java.lang.UnsupportedClassVersionError: java.lang.UnsupportedClassVersionError Unsupported major.minor version 52.0
⇒ You get this error because a Java 7 VM tries to load a class compiled for Java 8 (Java 8 has the class file version 52.0 but a Java 7 VM can only load class files up to version 51.0)
The issue is because of Java version mismatch. Referring to the Wikipedia Java Class Reference :
- J2SE 9 = 53
- J2SE 8 = 52
- J2SE 7 = 51
- J2SE 6.0 = 50
- J2SE 5.0 = 49
- JDK 1.4 = 48
- JDK 1.3 = 47
- JDK 1.2 = 46
- JDK 1.1 = 45
These are the assigned major numbers. The error regarding the unsupported major.minor version is because during compile time you are using a higher JDK and a lower JDK during runtime.
Thus, the 'major.minor version 52.0' error is possibly because the jar was compiled in jdk 1.8, but you are trying to run it using a jdk 1.7 environment. The reported number is the required number, not the number you are using. To solve this, it's always better to have the jdk and jre pointed to the same version.
javax.net.ssl.SSLHandshakeException
javax.net.ssl.SSLHandshakeException: sun.security.validator.ValidatorException: PKIX path building failed: sun.security.provider.certpath.SunCertPathBuilderException: unable to find valid certification path to requested target, requestUri = https://plf.kingvip.us/api/game/user_register?username=anhvclk&password=123456×tamp=1513743122935&hash=d5ae896e9bda2f1f8d14da4f2f437091 ⇒ fix: import the certificate of site to keystore lib\security\cacerts:
- Step1: Go to https://system.kybai.tv and save the certificate to file kybai.cer
- Step2: import the kybai.cer to keystore
keytool -import -alias kybai -file kybai.cer -keystore d:\tools\SmartFoxServer_2X\jre\lib\security\cacerts
(the password of keystore default “changeit” or blank)
And check if your certificate is already in the truststore by running the following command:
keytool -list -keystore d:\tools\SmartFoxServer_2X\jre\lib\security\cacerts
with password blank